Physical Address
304 North Cardinal St.
Dorchester Center, MA 02124
Physical Address
304 North Cardinal St.
Dorchester Center, MA 02124
I was pretty excited to discover that the Windows Photo Gallery application in Windows Vista includes easy to use photo editing tools and redesigned image import and organizational tools. The new editing features included in Windows Photo Gallery rival those found in several third party add-on programs that I’ve used over the years. Windows Photo Gallery now allows easy transfer of digital images to Windows Movie Maker as well as transfer of images to the brand new Windows DVD Maker. These tools all work together in a very intuitive manner and provide amateur photo enthusiasts with the tools they need to easily organize, rate, edit and distribute their digital images.
I’ve recently spent a fair amount of time showing a neighbor with a new digital camera how to use the features for image and photo handling in Microsoft Windows XP. While Picture Tasks in Windows XP allows her to perform a number of functions, there are no tools included to perform basic photo editing. She needs a third party program to do simple things like remove red eye and/or crop her photos.
Not everyone takes perfect pictures every time, and many new amateur photographers don’t know that adjusting exposure and/or color can “save” a bad image and turn it into a great one. Various external programs of varying complexity ranging from “free” to several hundred dollars are available to perform these tasks. There’s usually a steep learning curve, except for a few that offer auto adjustment modes.
I jumped on the digital camera bandwagon early on. I currently shoot with a Nikon D200 DSLR and also use a relatively new Nikon Coolpix P2. The D200 uses Compact Flash cards. I’ve programmed this camera to store images in both high quality JPEG and Nikon NEF RAW file formats to have the greatest flexibility in image editing and management. The Coolpix P2 uses Secure Digital (SD) cards and stores images using the JPEG file format.
Windows Photo Gallery handles an impressive number of file formats. I’ve been able to view and edit all the images I’ve shot with my two cameras except those shot in RAW format. For purposes of writing this column, I set my D200 to shoot both RAW and JPEG. The difference between RAW and JPEG is that JPEG is processed in the camera and RAW is normally processed on the computer (providing more power and control). Some RAW support will be available when Vista ships. Camera makers like Nikon and Canon will have RAW codecs available for download (and will eventually ship them with cameras) that will enable you to view RAW files in Windows Photo Gallery. Applications will be able to take advantage of API’s built into Vista and the upcoming RAW codecs to convert to formats (such as JPEG) for editing.
On the first warm Saturday in March, I jumped in the car and headed for the Stone Zoo in Stoneham Massachusetts to try out my new D200 with a new 18-200mm zoom lens. I also brought the travel sized Coolpix P2. When I returned home later that day, I realized that this was the perfect opportunity to try out the digital imaging capabilities of Windows Vista.
In this article, I’ll explain:
Before you can start using the many features of Windows Photo Gallery, you’ll probably need to go through a one time device detection and driver installation so that you can transfer images to your computer. Windows Vista smartly detects cameras connected via USB and treats them as removable hard drives.
I decided to try the built in 8-in-1 media reader in my desktop with the 4GB Compact Flash card I use with my D200. I removed the card from the camera and inserted it in the appropriate media reader slot in my desktop computer. Discovery, driver installation and the display of AutoPlay options were fast. Windows Vista performed the following functions automatically:

Figure 1:Windows Vista automatically detects camera storage when the camera is first connected with a USB cable.
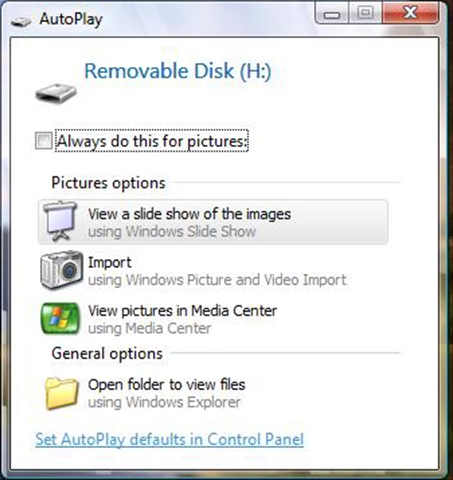
Figure 2: After recognizing the Compact Flash card as a removable disk, Vista automatically displayed the available choices.
I next used the Import function to add the JPEG images to Windows Photo Gallery.
Windows Vista displayed a message indicating the number of picture discovered and displayed the option to enter a tag as shown in Figure 3. Windows Vista and Windows Photo Gallery in particular allow you to augment files, including images with rich metadata to help you find, identify and sort files. I’m hoping to be able to write about how tags and ratings help enrich the end user experience in a future article.
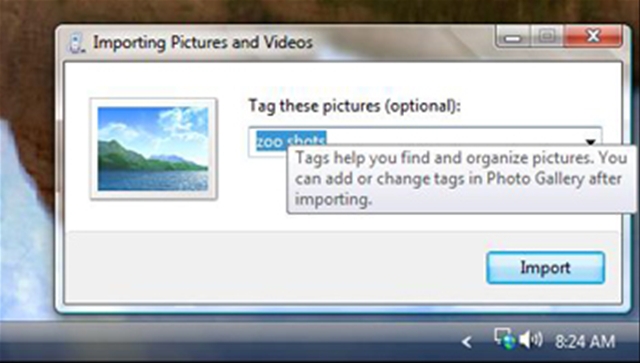
Figure 3: I created a tag named “zoo shots” which become part of the rich meta data that can be associated with files in Windows Vista
I then connected the Coolpix P2 via USB to the same computer so that I could import the images from the second camera into my zoo shots collection. Device discovery was again fast and easy as shown in Figure 4.

Figure 4: Windows Vista quickly completes auto-discovery and confirms successful device driver installation for the Coolpix P2 camera.
Note: If Windows Photo Gallery is already open, you can also import from a camera (or scanner) by selecting the File menu, Import from Camera or Scanner.
By default, Windows Photo Gallery includes the contents of the Vista Pictures folder. Adding additional content not stored in the default location is easy. You can even add photos stored on another computer on your home network. I’d been regularly transferring images wirelessly from the Coolpix to a computer running Windows XP Professional using the WiFi capabilities of the Nikon. Since I’d shot two media cards worth of photos with the Coolpix, I transferred the second batch of photos over my wireless 802.11 a/g network to the XP computer to see how Windows Photo Gallery would handle networked content. I was impressed!
Add folders to Windows Photo Gallery by following these steps:

Figure 5: Browse to the target location or type in the name of the folder you wish to add to Windows Photo Gallery.
Tip: When you add photos to the gallery, a Vista style browse window appears. You can browse to the folder you wish to add, or as a shortcut, type in the Path in the field that is provided. If you have images in a shared folder on a different computer on your network, you can type in the UNC path. The UNC path starts with a double backslash followed by the computer name. In the example in the image above, I started typing in \\gifthorse and after a few letters were typed, Windows Vista displayed the shared folders in a drop down list. I clicked to select the shared network folder with images to be added to the gallery. See Figure 5.
Once I had added all the images I’d shot from the zoo trip to the gallery, it was time to try out the editing features.
Tip: Although Windows Vista automatically keeps an intact copy of an original image that you can revert to, I find it best to save an extra copy an image before I edit it. To do this while in Fix mode, select the File menu, Duplicate. This lets me look at images side by side for comparison after editing is completed.
To access editing features, select the image to be edited and click the Fix menu. (The Fix menu items will display on the right.)
As you move the sliders to adjust Exposure or Color the change is made instantly. If you make an adjustment you don’t like, click the Undo arrow. If you use my tip above, you’ll always have a copy of the original image if you later decide to compare and don’t like the results.
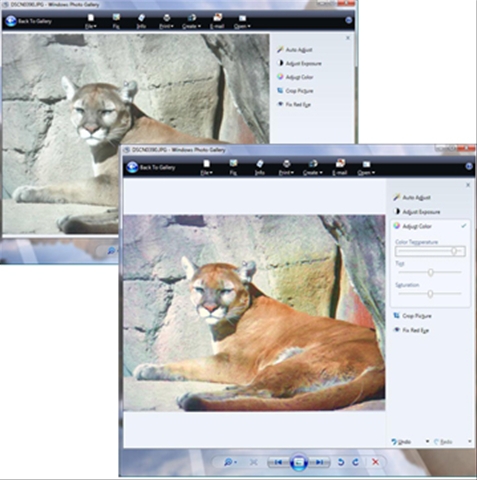
Figure 6: As I moved the Color Temperature slide to the right, the colors became warmer.
Two of the Fix menu features that I think I will use frequently are the Crop Picture and Fix Red Eye. Crop Picture can turn an uninteresting or too busy or confusing image into a better shot.
How to Crop a Picture

Figure 7: I am cropping this image to an 8 x 10 standard size in landscape format which I think makes a more interesting picture.
Note: There is an Undo/Revert arrow that can be used if you are not happy with the cropped result.
While I didn’t end up with any photos that needed Red Eye correction on my trip to the zoo, I still had a few old photos in my collection to use to try Photo Gallery’s Red Eye correction capabilities. Red Eye is usually caused by using flash. While some digital cameras offer a way to fix this in the camera, many do not. Fortunately, Windows Photo Gallery includes a feature to quickly and easily do this.
To fix Red Eye

Figure 8: I’ve zoomed in on a red eye to correct using the zoom slider and draw a rectangle enclosing the area to correct.
After I’d edited the pictures I shot on my trip to the Stone Zoo, I couldn’t wait to share the best of the group with friends and family. I’ve got an HP Photosmart 8450 printer connected via Ethernet to my router. I wanted to print a couple of photos to show my neighbor.
To print a photo:

Figure 9: With my fully supported HP Photosmart 8450, I have a wide variety of ways to print great photos!
Ordering professional prints from one of the online providers Fujifilm, Shutterfly, or Kodak Easy Share Gallery (formerly Ofoto) couldn’t be easier. These printing companies can all be accessed from the Print menu, Order Prints.
I was easily able to email my best shots to my cousin in Florida from within Windows Photo Gallery. As in Windows XP, images can be scaled to several sizes and are automatically attached to a new message in Windows Mail for you.
The Create menu in Windows Photo Gallery links to Windows Movie Maker and the new Vista DVD Maker as well as Create Data Disk (CD). Select a group of images and then select Create, Movie. The selected images are sent to Windows Movie Maker which opens automatically. Place a writable DVD in your DVD-RW drive, select a group of images, and then select Create, DVD. Windows DVD Maker will open. It’s really easy and intuitive.
Windows Photo Gallery supplies all the tools that an amateur digital photographer needs and is one of the easiest to use applications I’ve used. It is seamlessly integrated with other Windows applications to share digital content. I can’t wait for my friends and family who have needed help over the years to transfer, improve, and share their digital photos to upgrade to Windows Vista.